This tutorial was written by Monti on June 16th 2007. It's concept is copyrighted to Monti. Any creation you make from my ideas are yours. You may print out this tutorial for your own personal use, but please do not copy it in any way to put online, pass out or rewrite without my permission or worse yet attempt to claim as your own.
For this tutorial you will need
Paint Shop Pro
Ok we are ready to start.
REMEMBER TO SAVE OFTEN
Note: I am not providing a colour chart, just use colours of your choice.
Step 1:
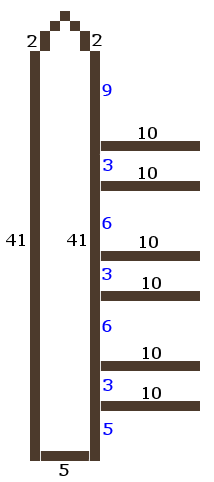
We will be be making the outline shown below. The outline below have been resized a lot so you can see it clearly.
To make this easier I have numbered all pixels over 1.
NOTE: The numbers in blue are the spaces between the horizontal lines.
Open a new image 100 x 100 transparent.
Select the brush tool with the following settings.
Size: 1 - Hardness, Opacity and Density: 100
Zoom in to about 800% - 1000%
I find it easier to start the highest point, in this case the top of the vertical fence post. (You can move the image later using your move tool if you need to).
Set your foreground to colour #4C3A2C or a colour of your choice and start at the top tip of the fence post.
Do all of the fence outline.
Crop the image to size.
Step 2:
When your outline is complete, select your magic wand with the following settings and click inside the long vertical post n the left.
Select colour #936D50 or a colour of your choice and flood fill that selection.
Keep selected.
Selections float, Effects 3D effects, Cutout with the following settings
Vertical: 0
Horizontal: 0
Opacity: 95
Blur: 6
Shadow colour: Use your fence outline. Colour 2 (#4C3A2C).
Make sure fill interior with colour is UNchecked.
Go to Add/Remove Noise - Add Noise - Gaussian checked - Monochrome checked - Noise set to 5.
Deselect.
Step 3:
Select your magic wand and click inside the top horizontal post.
Select colour #936D50 and flood fill that selection.
Keep selected.
Selections float, Effects 3D effects, Cutout with the following settings
Vertical: 0
Horizontal: 0
Opacity: 85
Blur: 5
Shadow colour: Use your fence outline. Colour 2 (#4C3A2C).
Make sure fill interior with colour is UNchecked.
Go to Add/Remove Noise - Add Noise - Gaussian checked - Monochrome checked - Noise set to 5.
Deselect.
Repeat for the other two horizontal posts.
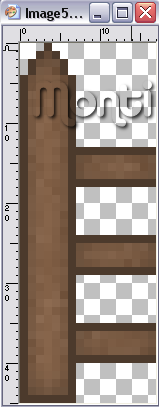
It should now look like the one below.
Save this as a psp tube so you can use it again in the future.
Step 4:
Open a new canvas. The size depends on how long you want your fence to be.
Copy and paste the fence as a new layer, lining up the vertical post with the edge of the horizontal posts.
Repeat this until it is the width you want.
To finish it off at the other side, copy and paste as a new layer, go to Image - Mirror and use your mover tool to move into position at the right side of the fence, lining up the horizontal posts.
Merge visible and crop to size, then either save as a psp tube or as a png.
Why not add some of your pixel animals to it like I have below.


No comments:
Post a Comment